Have you ever thought about doing something like this?
- You want to add additional custom content for each post that will display at the end of the post.
- You want to display more information for custom post types. For example, you are using our UXbarn Team plugin, and you want to display one more field about the department of each team member.
You might wonder how to do that and how difficult it is to create and display those custom fields. With the help of the Advanced Custom Fields plugin, it would be very easy.
In this Advanced Custom Fields tutorial, we are going to show you how you can use the plugin to add custom fields to WordPress posts step-by-step.
Requirements
- Advanced Custom Fields Plugin
- Kose WordPress Theme (We use our theme for demonstration)
- Knowledge of PHP (HTML and CSS would also be helpful for formatting the front end data)
What is Advanced Custom Fields Plugin?
It is a plugin that allows you to manage custom fields for WordPress posts. The custom fields are usually used to show additional information on the posts. For example, if your posts are mostly about food and restaurants, you might want to have extra content like restaurant name and address showing along with the normal content.
Or, you can implement the custom fields as conditions for doing something. For example, you might add a custom checkbox field so you can choose whether to show or hide the restaurant name and address section.
Those are just basic examples of how you can use the plugin. You can implement it in any other ways depending on your needs.
Creating Custom Fields for Posts
Suppose we have a food blog like this:
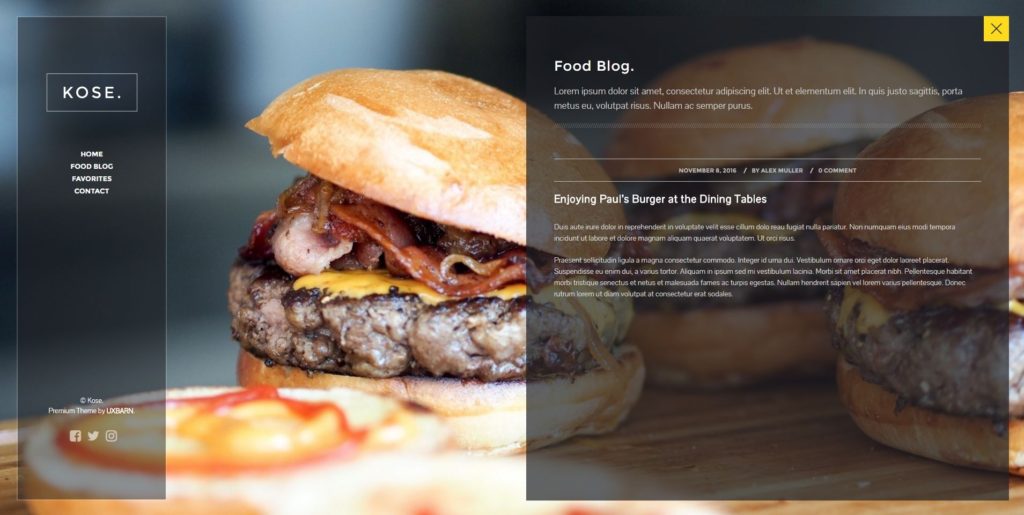
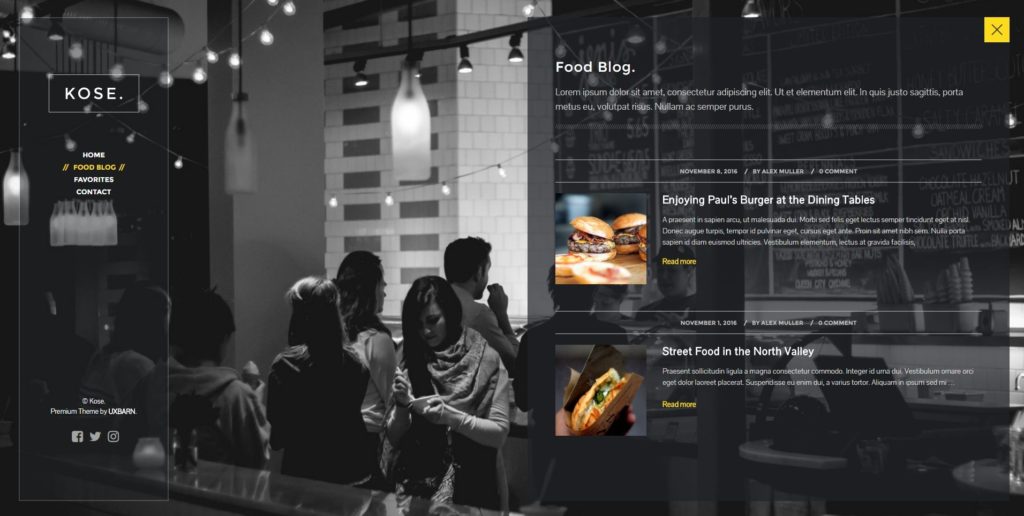 And when the readers click on each post, they will see a single page like this:
In this case, we are going to add the Restaurant Name and Address fields to every blog post. The fields will then be available on the post edit screen so you can enter the information. After that, we are going to display the information at the end of the post content when viewing on the front end.
Finally, we are going to create a true/false field to toggle the display of those two fields.
Let’s do it!
Create and Display Restaurant Name and Address
1. Go to the “Custom Fields > Custom Fields” menu to open the Field Groups page. Click “Add New” to start creating new custom fields.
2. In this section, we want to create custom fields for blog posts, so we name it as “Posts Custom Fields.”
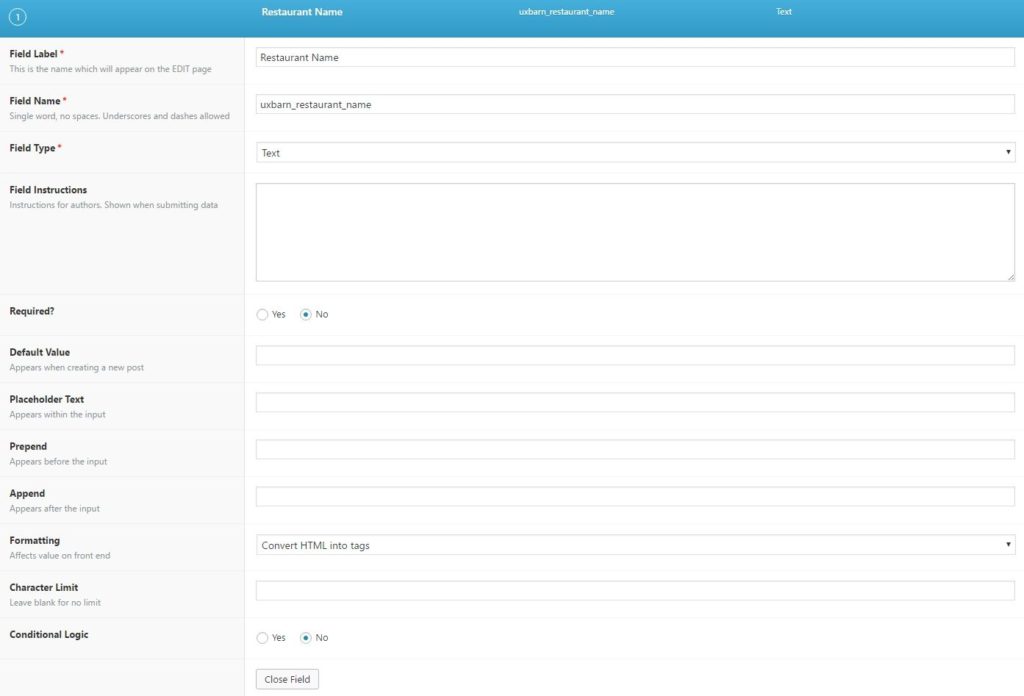
3. To create the Restaurant Name field, click the “Add Field” button.
Then enter the setting values like this:
Some important settings we want to mention are:
- Field Name: It works like an ID of the field. It is used when saving data to the database, and when you want to display the field data on the front end, you will need to use it.
- Field Type: You can choose the type of the field using this setting. For example, if you want to accept and show a simple text, the “Text” type would be enough. If you want to create choices for selection, you may choose the “Radio Button” type.
- Conditional Logic: This setting can be used to toggle the visibility of the current field if the defined logic matches. You will see a real example later in this article.
Note that the settings of each field type might be different from each other.
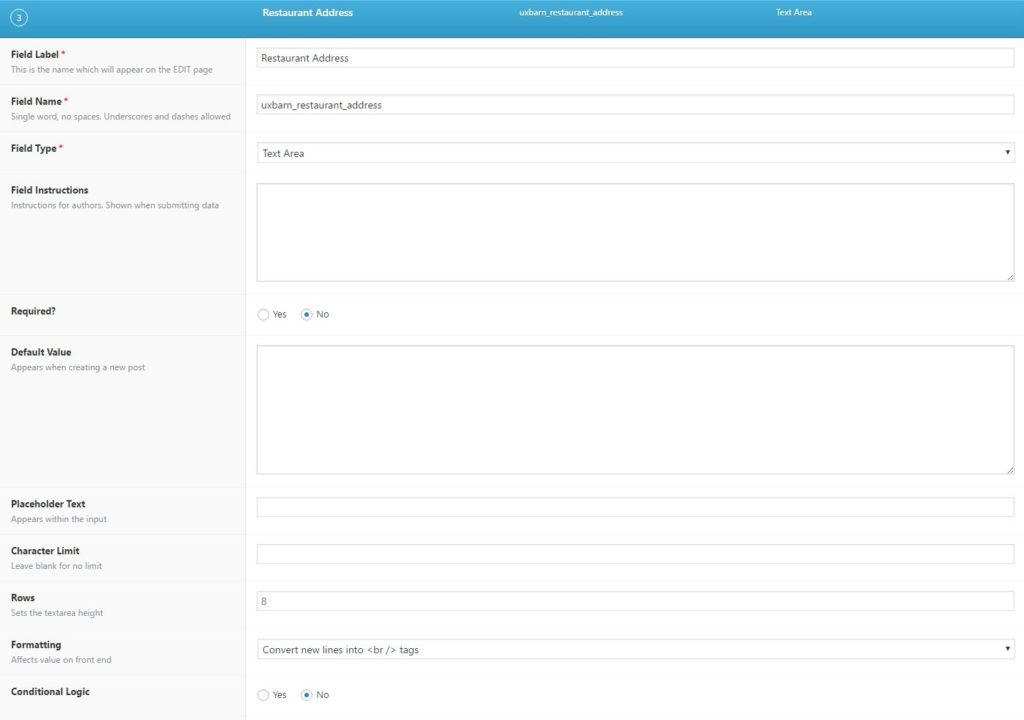
4. Repeat step 3 for creating an another field named “Restaurant Address” with the “Text Area” field type.
5. After creating the two custom fields, we have to tell the plugin which post type we want these fields to work with. In the Rules setting, just select “post” for the post type. It means that the created custom fields will be used in blog posts.
Under the Location box, there is the Options box for additional settings for the custom fields. You may adjust the position and the style of the fields using the settings in this box. We will leave them as default in this tutorial.
6. Click the “Publish” button to save the fields.
7. When you open the edit screen of a blog post, you will see that the custom fields are displayed. Just enter the information you want into the fields and save the post.
8. Now it’s time to display the entered information on the front end. To do this, we have to manually customize the theme code in the “single.php” template file. So, we create a child theme to override the code in the file.
In the child theme’s “single.php” file, find this code:
[php]
<div id="single-content-wrapper">
<?php echo uxbarn_get_final_post_content(); ?>
</div>
[/php]
We want to display the custom data right under the post content. So, we add the additional code like this:
[php]
<div id="single-content-wrapper">
<?php echo uxbarn_get_final_post_content(); ?>
</div>
<div id="custom-field-data">
<div class="custom-block">
<span>Restaurant Name</span>
<?php the_field( ‘uxbarn_restaurant_name’ ); ?>
</div>
<div class="custom-block">
<span>Address</span>
<?php the_field( ‘uxbarn_restaurant_address’ ); ?>
</div>
</div>
[/php]
Note that the the_field() function you see in the code belongs to the Advanced Custom Fields plugin.
For more examples of the functions of the Advanced Custom Fields plugin, see its documentation here: https://www.advancedcustomfields.com/resources/code-examples/
And here is the custom CSS used to create the style of the custom data:
[css]
#custom-field-data {
border: 1px solid #888;
display: inline-block;
padding: 1.5em 4em 1.5em 3em;
}
#custom-field-data span {
color: #fff;
display: block;
font-weight: bold;
}
#custom-field-data span::after {
content: ‘:’;
}
.custom-block {
margin-bottom: 15px;
}
.custom-block:last-child {
margin-bottom: 0;
}
[/css]
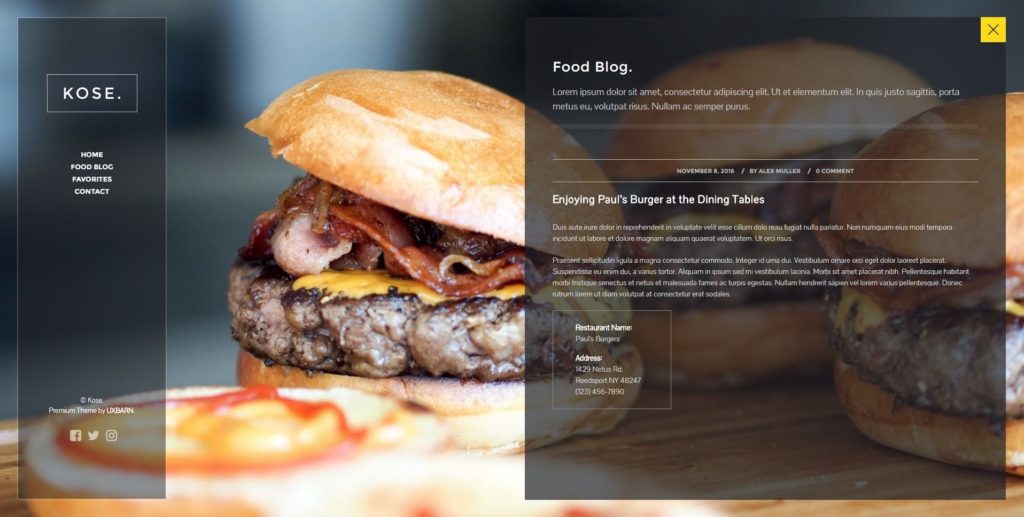
Finally, when viewing the post, the custom data will be displayed like this:
Show or Hide the Restaurant Name and Address
In this section, we are going to create a true/false field allowing you to display or hide the created restaurant name and address box.
1. Go to the “Custom Fields” menu and click the “Posts Custom Fields” entry (or whatever the name you have chosen) to open the edit screen.
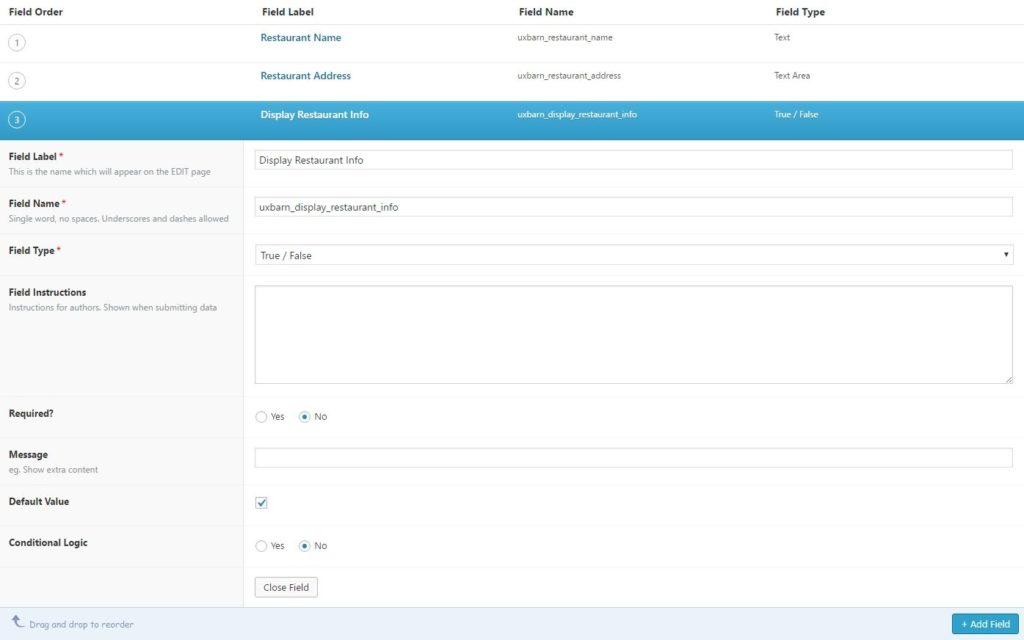
2. Click the “Add Field” button to create a true/false field like this:
3. Click on the order number of the “Display Restaurant Info” field and drag it to the top.
4. Now we want to control the visibility of the Restaurant Name and Address fields on the back end based on the selection of the created true/false field.
First, click to expand the Restaurant Name field and select “Yes” for the “Conditional Logic” setting. Then select the dropdown list like this:
Do the same for the Restaurant Address field and save.
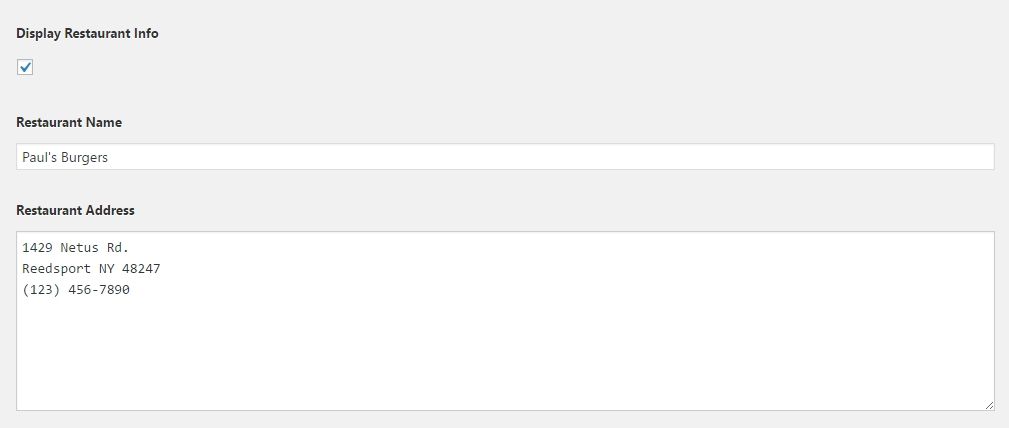
The logic tells the plugin to display the fields on the back end only when the “Display Restaurant Info” field is checked. If you open the edit screen of a post, you will see the fields showing like the screenshot below:
When the “Display Restaurant Info” is unchecked, the Restaurant Name and Address will be hidden.
5. Before saving the post, we also want to hide the restaurant info box on the front end if the field is unchecked. We do that by customizing the code in the child theme’s “single.php” file like this:
[php]
<div id="single-content-wrapper">
<?php echo uxbarn_get_final_post_content(); ?>
</div>
<?php if ( get_field( ‘uxbarn_display_restaurant_info’ ) ) : ?>
<div id="custom-field-data">
<div class="custom-block">
<span>Restaurant Name</span>
<?php the_field( ‘uxbarn_restaurant_name’ ); ?>
</div>
<div class="custom-block">
<span>Address</span>
<?php the_field( ‘uxbarn_restaurant_address’ ); ?>
</div>
</div>
<?php endif; ?>
[/php]
That’s it. After saving the post with the “Display Restaurant Info” field unchecked, the Restaurant Name and Address fields will be hidden on both front end and back end.
Creating Custom Fields for Custom Post Types
The steps for creating custom fields for custom post types are actually the same as the above. The only thing you need to change is the Rules setting. You just need to choose the custom post type you want custom fields to work with.
For example, if you want custom fields to be applied to the UXbarn Team post type, you need to create the Rules setting like this:
Conclusion
You have just learned how to use the Advanced Custom Fields plugin to create custom fields for normal blog posts and custom post types. The created fields will be displayed on the back end allowing you to enter custom information for posts. Then you will be able to display the information on the front end by using the available plugin functions.
For the full documentation of the plugin, please go to this URL: https://www.advancedcustomfields.com/resources
We hope you find this article useful. Enjoy your customization!







1 Comment
Comments are closed.